자산. 액세서리

물품. 부적.

비용: 1. XP: 3.

생존자

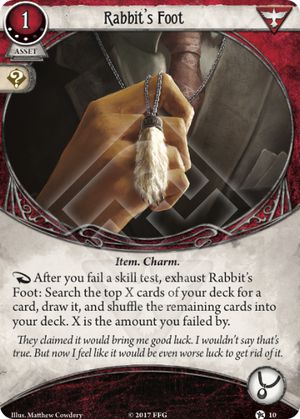
당신이 능력 테스트에 실패한 후, ‘행운의 토끼 발 부적’을 소진합니다: 당신의 덱 맨 위 카드 X장 중에서 카드 1장을 찾은 뒤, 그 카드를 뽑습니다. 남은 카드들은 당신의 덱에 다시 넣고, 덱을 섞습니다. X는 당신의 능력값과 이 난이도에 모자란 차이입니다.

사람들은 토끼 발 부적이 행운을 가져온다고 말한다. 이전까지는 그런 이야기에 코웃음을 쳤지만, 지금은 그 부적의 행운에라도 매달려야 할 것 같다.
Matthew Cowdery
돌아온 광신도의 밤 #10.
행운의 토끼 발 부적

FAQs

No faqs yet for this card.

Reviews

A perfect card for those Wendys out there, that are in direct contact with a tough enemy and would like to pick a fancy card by trying to sucker punch him with a "1" fight skill. All those Calvins out there don't even need an enemy. It's enough for them just to be at the beggining of the scenario and trying to get a life. To be honest almost every investigator has a way to forcibly trigger the condition on the maximum possible outcome.

But it's a question whether you actually want that. Whether you have time and need to dig. In my recent runs with this card (normal difficulty) it was not essentially better than a simple 0-level version. I had 4 occasions to use it. 3 of them were just a single card draw, but this one time I was really cherry picking a card that hit the sport perfectly.

Is it worth those 3XPs? On hard/expert it rather is. On easy/normal it's one of those updates you can perform later during the campaign, when chaos bag is getting more and more sick and negative.

Onetribe · 337

The last review on this card comes from 3 years ago, before the incredible Stella Clark was released. Initially I had overlooked this card in Stella, and in fact DIDN'T include it in my first Solo run of TFA (where I died, brutally). I ran it back and started fresh, and this time picked up two copies of Rabbit's Foot (3) for my deck because it seemed neat, if a high XP investment.

It took exactly one scenario to see how insane this card is for Stella.

I would regularly dig 3-8 cards deep, looking for exactly what I needed for the situation at hand, and I did it while not actually costing me tempo because I could intentionally tank a test, trigger Stella's bonus action, and keep my hand stocked with goodies. Couple this with the already insane Drawing Thin (my run was untaboo'ed, but I would've gladly dumped 9 of my XP for 2 Feet and a Drawing Thin coming off the first scenario), and you become a beast capable of always having an answer to problems. Add in Live and Learn, another great Stella card, and suddenly you're down 0 actions and you get to dig crazy deep AND get a bonus on your next test.

This card is now one of, if not THE, most important card I mulligan for. It finds everything, it's cheap, it doesn't chew up a hand or ally slot, and the effect is overwhelmingly useful. Have you ever drawn the autofail token and shouted with joy "YES!"? It's not as unlikely as you'd think. Failing that Track Shoes test you didn't need, digging 5 cards deep, and getting a free action is a pretty good way to come out ahead when the chaos bag tries to give you the business. It's incredible and I highly recommend you give this card your time of day if you are playing Stella Clark. The foot really is lucky.

Somidna · 9
Really great in anyone that likes to take Drawing Thin, which incidentally is also an amazing Stella card. — StyxTBeuford · 13019
On Stella the only contest is from Gristly Totem (3). Of course she'd also like both with Relic Hunter, but prioritizing them is tricky. — suika · 9461
Run this along side Mandy and laugh as you turn any failed test into a double draw action or search half your deck. — Zerogrim · 293
One thing to be careful of with adding Live and Learn to the combo with Drawing Thin is that the follow-up test still has the +2 difficulty, but doesn’t reward any more cards/resources for it. DT modifies the test itself and L&L repeats that (modified) test. — Death by Chocolate · 1460
I have definitely come around on card draw and both the L0 and L3 versions are great cards even if you aren't running fail on purpose cards like Drawing Thin and Track Shoes. You still fail enough tests in Survivor to get a great value out of the card. The only issue is that it runs into a crowded slot with Grisly Totem, Cherished Keepsake and others. — The Lynx · 979

Return to NoZ certainly brings some interesting upgrades. Rabbit's Foot is considered to be a good card because it alleviates the opportunity cost of failing a test, which usually boils down to wasting an action, by turning that wasted action into drawing a card. Especially in the class that often runs extremely light on resources, drawing a card can be the most valuable consolation action, and it doesn't usually face stiff competition for the relic slot.

Yet treachery cards exist therefore blindly drawing threatens disaster at any moment... So enter bunny memento mk II. Failing a test by more than 1 yields actual card selection rather than simply drawing, helping to dig for specific answers or important assets while avoiding poorly-timed treacheries (or even intentionally drawing them at a time of minimal impact).

Whiffed on grabbing Fire Axe after your mulligan? This helps fight those fires. Trying to bet on a Dark Horse? Bunny's got you covered. The very act of failing the tests as you attempt them will help you find the pieces you need to overcome them. If you get lucky then awesome, but if you fail then fail with style. In fact this card turns tests on their head so that is often going to be a better pull from the chaos bag than , , or !

The most interesting application seems to be with Silas Marsh because he can sometimes choose to fail non-essential tests and appreciates the card flow. Most survivors tend to struggle to spend XP after upgrading their ally suite and are forced to grab things like Lucky! for a tiny bit more efficiency. I can easily see this replacing that in many an XP schedule.

The_Wall · 286
Is there a difference between shuffle your deck and shuffle x cards into your deck? — Django · 5078
@django Mechanically speaking, I don't think so. — SGPrometheus · 815

TLDR; This card is great a mitigating failure, which is going to happen (especially on harder difficulties).
Any effect that lets you "dig" for cards is a great include, and this version of Rabbit's Foot really shines on harder difficulties, acting as a catch-up card. Playing on Hard or Expert really teaches you to "pick your battles" when it comes to skill tests. Failing happens, and If I'm playing Hard and am already 3 down on a test with only 3 icons to commit, I'll save my cards for a future "battle" instead of hoping for that 0 or Elder Sign from the chaos bag. The only exception to this IMO is a Treachery with a "...for each point you failed by" effect.

This Rabbit's Foot mitigates the failure by allowing you to find the best card from the top X of your deck. It need not be the best card in your deck, but anything is better than that weakness that always seems to be lurking right on top after an especially painful failure.

I also like that this is a 3XP card. It's made for Survivors and can't be splashed into non-Survivor decks like its Level 0 counterpart (which is a decent splash card for any who can take it because, again, failure happens).

Wendy Adams is the only Survivor with direct competition for the Accessory slot (at least with a signature card), but the class has so much recursion that I might only use her Amulet for the icons anyway, especially on harder difficulty.

I'd probably prioritize Police Badge with William Yorick, but it's meant to be discarded (and recurred) anyway, so there's no reason to not sleeve Rabbit's Foot as well.

Silas Marsh likes this card because you can commit a Skill card and if you're going to fail anyway after drawing the Chaos Token, just use his Reaction to pop the Skill back to your hand and dig a little deeper into your deck for another card.

Expect to fail some tests with Calvin Wright until you get him going, and this card will help him get going. You want Calvin to "ride the line" with Damage and Horror, so this is an especially good Accessory to replace Cherished Keepsake when it has 3 Horror on it so you don't have to exile it, or dig for something to replace Leather Coat for the same reason.

This card obviously is amazing with Stella Clark and her Reaction.

"Ashcan" Pete will like this card to dig for a card he doesn't mind discarding to ready Duke: A Glimmer of Hope, Improvised Weapon, Impromptu Barrier, Winging It, etc., if you're playing them, or something like Resourceful or Scrounge for Supplies to get something back.

Rita Young might like this with her 2 Intellect.

=== EDIT ===

Patrice Hathaway doesn't really need this card, as she is always going to have a hand full of cards to throw at a test. (Thanks StyxTBeuford for pointing that out!)

Lola Hayes can also play this card and, while she would benefit from it, it's not going to trigger for her as often as it will for others when she finds herself in a non-Survivor role.

This card is great a mitigating failure, which is going to happen (especially on harder difficulties).

I actually disagree that Patrice likes this at all. 1. She draws 5 cards a turn, and often barely has the actions to commit them all so any “draw card” effect with her is usually very wasteful. 2. Her stats are deceptive, she actually rarely fails because she commits so hard. Finally she 3. has access to Rosary and Moonstone, which fit much better with her Mystic access. — StyxTBeuford · 13019
I would instead mention that this card makes great sense with Preston Fairmont, as you expect to fail Mythos tests with him — StyxTBeuford · 13019
@StyxTBeuford you're absolutely correct about Rita, and I'll edit to review to reflect that. Of course she's always going to have a handful of cards to commit! — DrMChristopher · 482
@StyxTBeuford (I hit enter prematurely)... But Preston can't take this version, although take Rabbit's Foot (0), which would be very good for him. I also forgot about Lola who CAN take Rabbit's Foot (3). I think she would like it in her deck, but she's not going to get as much work out of it as other if she's not in the Survivor role. I will admit, though, that I'm not good enough yet to build OR pilot Lola, so I can't say for sure. — DrMChristopher · 482